DMARC stands for "Domain Message Authentication, Reporting & Conformance", which is a technical protocol to determine the legitimacy of an email message by checking if it matches with SPF (Sender Policy Framework) and DKIM (DomainKeys Identified Mail) technical records.
SPF/DKIM records are used to prevent spam and improve legitimate email delivery. Every domain name should have them. If you have multiple domain names on your hosting account, you should implement these instructions for every domain name you send emails from.
SPF/DKIM records are created automatically on all new hosting plans. If you have an older hosting plan, or if you want to check the records are setup correctly, you can use the "Email Deliverability" page in your cPanel control panel. On this page, you'll see a list of all your domain names, and beside each one there is a 'Repair' button (if a repair is required) and a 'Manage' button (to view/edit the records). On the repair/manage page, please install the recommended SPF/DKIM records on the cPanel control panel.
Note: If you send outbound email from your domain name using any other email provider (for example Google Apps/Suite, MailJet, SendGrid), it's very important that the SPF record is updated to include that provider.
Also: If a recipient reports that your message was in their spam folder, please ask them to mark it as "not spam", as it will make a difference to your domain reputation.
If your SPF/DKIM records are setup correctly, but you still encounter issues with email deliverability, you may wish to implement DMARC on your domain name.
As SPF/DKIM records have become commonplace in the last few years, DMARC will become commonplace in the next few years. DMARC records are quite technical, and they are typically managed by an IT person within your workplace. Below, we provide some examples of standard DMARC records that you can use on your domain name.
Create a DMARC record for your domain name
Step 1 - Login to cPanel and open the Zone Editor
To install a DMARC record, please login to your cPanel control panel and go to the "Zone Editor" page:
This page will list all your domain names, so find the relevant domain name in the list and click on the 'Manage' button:
On the next page, you'll see a list of all the DNS records for your domain name.
Step 2.1. - Finding and editing an existing DMARC record
First, we have to check if a DMARC record already exist for your domain. You can filter the DNS records by type, so please click on "TXT" next to the "Filter" option, then enter "dmarc" into the search box.
If you see an existing TXT record for for _dmarc.yourdomain.tld. (for your actual domain in place of yourdomain.tld), then your domain already has it and you can end this guide here. Should DMARC not work correctly or require adjustments, then please click on the "Edit" button:
Step 2.2. - Adding a new DMARC record
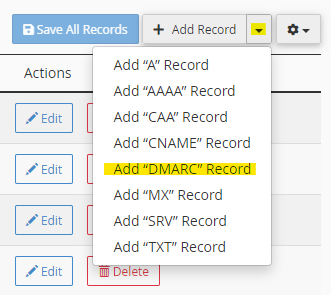
Otherwise, if no DMARC record exist, please create a new record by clicking on the down arrow next to the button "+ Add Record":
Please note that only one DMARC record per domain may exist.
Step 3 - Configuring the DMARC record
Quick setup - To simply add a DMARC record quickly, you can just select the Policy "Quarantine" and click on "Save Record":
That's it! Your domain would now have a basic DMARC record and you can end the DMARC setup here.
Customising the DMARC record (advanced options)
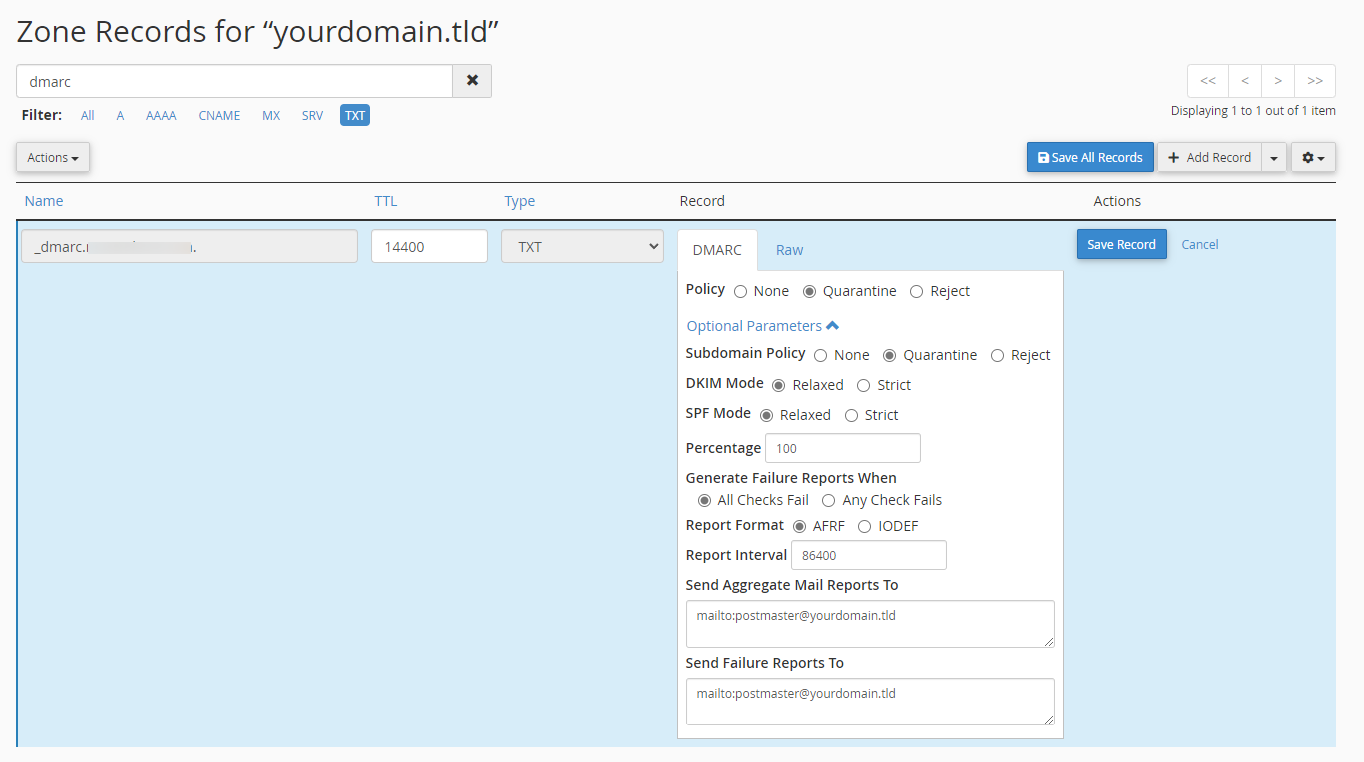
Whether you edit an existing DMARC record or add a new one, you should see the following options under the "Optional Parameters" drop-down:
On the DMARC tab, cPanel allows you to define the DMARC settings and it then it adds the respective record in raw format to your DNS zone. You can simply leave the settings You can also use the above settings if they correspond to your requirements.
Understanding the DMARC record options
You can customise the settings, as follows:
- Subdomain Policy — The action the mail server will take when it receives an email from the domain’s subdomain. The server only takes this action if the email fails its SPF and DKIM checks, indicating that someone may have tried to impersonate you or your domain (provided that your domain's SPF and DKIM records are setup correctly).
- None — Do not take any action (not recommended). Use this option if you'd like emails from your domain to be delivered regardless whether they pass the authentication checks or not.
- Quarantine — Send spam email to a different folder on the account (recommended option). This option would put emails from your domain in the spam/junk folder if they don't pass the authentication checks.
- Reject — Reject spam email. This option denies all emails from your domain if they don't pass the authentication checks.
- DKIM Mode — The DKIM level that the server enforces for the domain. An email must have a valid DKIM signature. The server will check a DKIM signature against the email’s
From:domain entry. You can set the following identifier alignment settings:- Relaxed — Only the organizational domains must match. For example, an email from the
domain.yourdomain.tldsubdomain ofyourdomain.tldwould pass the DKIM check. - Strict — The domains must match exactly. For example, the server will accept email from the
yourdomain.tlddomain, but it would reject email from thedomain.yourdomain.tldsubdomain.
- Relaxed — Only the organizational domains must match. For example, an email from the
- SPF Mode — The SPF level that the server will enforce for the domain. The server sending email must pass SPF authorization. The server checks the server sending an email with the SMTP
MAIL FROMcommand. The server then checks theMAIL FROMdomain entry against the email’sFrom:domain entry. You can set the following identifier alignment settings:- Relaxed — Recommended option — Only the organizational domains must match. For example, an email from the
domain.yourdomain.tldsubdomain ofyourdomain.tldwould pass the SPF check. - Strict — The domains must match exactly. For example, the server will only accept email if the domain is
yourdomain.tld. It would reject an email from thedomain.yourdomain.tlddomain.
- Relaxed — Recommended option — Only the organizational domains must match. For example, an email from the
- Percentage — The percentage of emails that you want the server to filter. We recommend a value of 100.
- Generate Failure Reports When — The error reporting policy between the sender and receiver’s Mail Transfer Agents. The "All Checks Fail" is the recommended option.
- Report Format — The format that the server uses to report an email’s possible spam status. The default option "AFRF" should be fine, but if your organisation uses incident response tools, the "IODEF" is more widely supported.
- Report Interval — The amount of time, in seconds, that elapse between each aggregate email report. This parameter’s value defaults to
86400(24 hours). This does not include email failure messages. - Send Aggregate Mail Reports To — A comma-separated list of Uniform Resource Identifiers (URIs) to which to send the aggregate email reports.
- It must include the
mailto:URI before the email, for example:mailto:postmaster@yourdomain.tld- If you enter only one email address and forget to append the URI, cPanel will automatically add it for you.
- For multiple email addresses, you must add the URI by yourself and separate the email addresses with commas, for example:
mailto:postmaster@yourdomain.tld,mailto:reports@yourdomain.tld
- To add a size limit for the report, include an exclamation point, a number, and a file size unit to the end of the URI. For example:
mailto:reports@yourdomain.tld!50m. You can specify the following file size units:k— Kilobytes.m— Megabytes.g— Gigabytes.t— Terabytes.
- It must include the
- Send Failure Reports To — A comma-separated list of URIs to which to send failure email reports. The format and options are the same as above.
Raw DMARC editing
Alternatively, you can also enter the DMARC record in raw format by clicking on the "Raw" tab:
Pre-defined DMARC setups
Some standard DMARC raw records are:
(1) Quarantine all SPF/DKIM failures:
v=DMARC1; p=quarantine; sp=none; rf=afrf; pct=100; ri=86400
This is our recommendation. If an email fails both SPF and DKIM checks, the DMARC policy will quarantine the message (on most providers this means sending it to a junk/spam folder).
(2) Reject all SPF/DKIM failures:
v=DMARC1; p=reject; sp=none; rf=afrf; pct=100; ri=86400
If an email fails both SPF and DKIM checks, the DMARC policy will advise the receiving email server to reject the message (normally resulting in a bounceback message).
(3) No action with SPF/DKIM failures:
v=DMARC1; p=none; sp=none; rf=afrf; pct=100; ri=86400
With this option, DMARC is installed but does not instruct the email server at all.
If you are not sure which one to use, we recommend the "quarantine" option. If you encounter any issues, our support team can advise/assist you.
Note: Some email servers have their own local policies that will override the DMARC policy. There are some examples on the MXtoolbox website: https://mxtoolbox.com/dmarc/details/dmarc-policy-override-types
Test Your DMARC Records
You can check if your domain's DMARC record exists and is configured correctly here: DMARC Check Tool - Domain Message Authentication Reporting & Conformance Lookup - MxToolBox
Translate the DMARC Reports
The DMARC reports for emails that fail to pass SPF and DKIM authentication (if reports are enabled) are sent in XML, AFRF or IODEF format. To make the reports human-readable, you can use DMARC report analyser tools, such as these ones:
- DMARC Report Analyzer - DMARC Email XML Parser - MxToolbox
- DMARC Analyzer - DMARC Advisor
- DMARC Analyzer, Diagnostics, and Monitoring | EasyDMARC
These tools should help you identify which servers have sent emails from or on behalf of your domain. If there are trusted servers on the list, you should add them to your SPF records to assure that your emails get delivered from those servers in the future.
External Email Services
If your email is with Google Mail or Microsoft 365, there is further information on DMARC records here:
Help prevent spoofing and spam with DMARC - Google Workspace Admin Help
Use DMARC to validate email, setup steps - Office 365 | Microsoft Learn
Updated by SP on 05/05/2023


